
22/4 Mid week blog#211 - Mystery Stamping with a twist - creating a Scrapbook page with mystery clues.
- Alison Culliver
- Apr 22
- 4 min read

Take a step by step journey with me to create a fun scrapbook layout.
Hello & welcome to my blog.
My name is Alison & I live in beautiful Melbourne, Australia & I am an independent Stampin' Up® demonstrator.
I love to create beautiful things to share with people that I love but I also sell me creations. I have been creating things in one way or another for most of my life - knitting, sewing, cooking, card making, gardening, scrap booking & hand made gifts & in 2020 after joining Stampin' Up® I decided to share my passion in a blog (craftedbyalison@blogspot.com).
In 2025 I retired & decided to spread my creative wings a little more by combining my blog, products that I had been selling on FaceBook & launching a newsletter. Some of these things I had already been doing but this time they are all in the one place. (All previous posts can be found at my blogspot address above if you would to read any of them.)
And here we are at my new site!
In today's post I will share a step by step way to create an easy scrapbook layout using mystery clues. I created my page using the Painted Illusions DSP & Pretty Peacock cardstock but you can substitute these & the stamps & dies I used for what you have on hand.
You will need the following supplies…
2 sheets Painted Illusions DSP with the 'floating leaf' pattern. This is DSP 1. Cut one of the sheets to make a 2 1/2" & 6" panel.
1 sheet Painted Illusions 'Green & Blue swirl' pattern. This is DSP 2. Cut two panels from this sheet measuring 3" x 7".
1 sheet of Basic White cardstock with a 2.5" x 4" panel cut from it
Pretty Peacock cardstock measuring 6" x 4 1/2"
12" x 1" strip of Granny Apple Green two tone cardstock
Petals of Beauty Stamps & dies
Gears & Textures dies
Textured Notes dies
Addressed to You stamp set - optional
Soft Sea Foam Classic Stampin' pad
Granny Apple Green Classic Stampin' pad
Shaded Spruce Classic Stampin' pad
Pretty Peacock Blends
Adhesives of your choice.
Now I will share the prep work, each of the steps I took & include some photos to help (great for visual learners!)
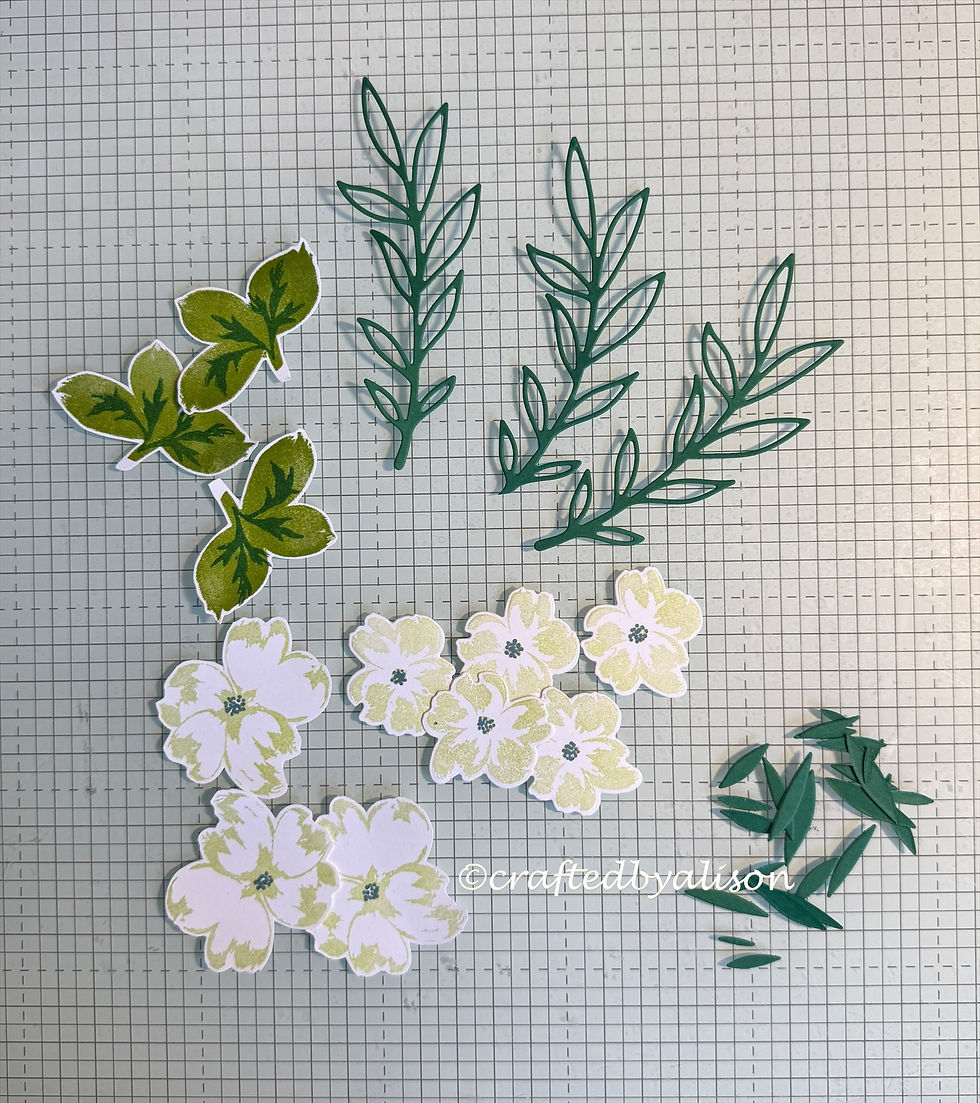
Stamping & diecutting.
Using Soft Sea Foam, stamp 3 large flowers & 5 smaller flowers from the Petals of Beauty on Basic White cardstock. Add some centres with the Pretty Peacock blend pen. Diecut the smaller flowers with the co-ordinating dies & fussy cut the larger flowers.
Using Granny Apple Green, stamp the three leaf image in Granny Apple Green, adding the centre with second generation Shaded Spruce. Fussy cut.
Diecut 3 of the larger open leaf design from the Petals of Beauty dies from Pretty Peacock cardstock, retaining the centre pieces that are left behind.
Diecut 2 Chain Link designs in Pretty Peacock using the Gears & Textures dies.
Using the 2.5" x 4" piece of Basic White, diecut a journaling panel with the middle die from Textured Notes dies (sorry, this die set is now retired!). Rule some journalling lines approx. 1/2" apart or stamp with the lined stamp from Addressed to You.


##I find it's best to place all of the elements without adhering them to begin with & adhere them once you are happy with the final placement.
Step 1. Using one full sheet of DSP 1 beehive pattern (top layer) as the base page, place the 2 1/2" x 6" panel (DSP 2) 2 1/2" from the top of the page with 4 3/4" on each side.

Step 2. Place the 12" x 1" Granny Apple Green strip over this panel approx. 4 1/2" from the bottomof the page.

Step 3. Place the two 3" x 7" DSP 1 panels approx. 3.5" from the top of the page and 1" from the edges.

Step 4. Once you're happy with the placement, adhere all of these pieces down.
Step 5. Place one of the Pretty Peacock chain pieces approx. 1 1/2" from the bottom of the left panel & the other approx. 1 1/2" from the top of the right panel.
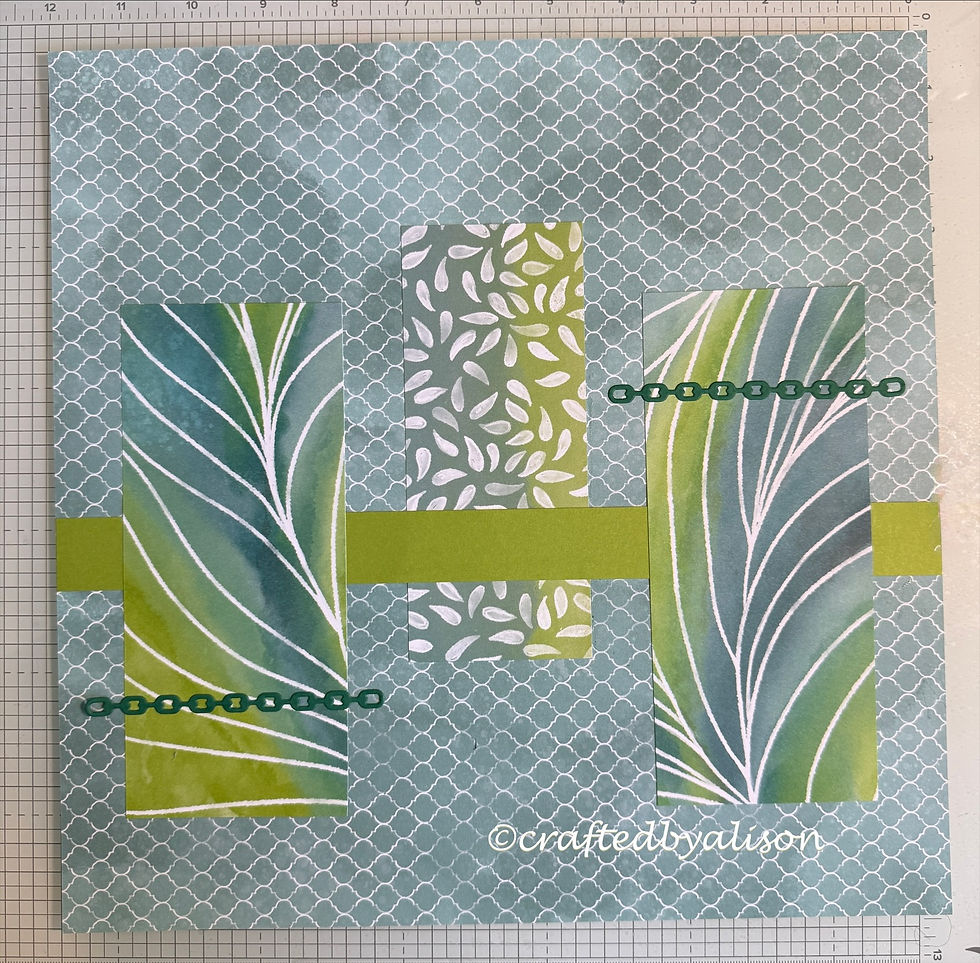
Step 6. Adhere the journaling panel on the centre panel above the Granny Apple Green strip.

Step 7. Adhere a 2.5" x 3.5" Basic White panel towards the top of the left panel & another towards the bottom of the right panel. If you choose, you may miss this step if you prefer to add your photo without a matte.

Step 8. Arrange 4 groups of flowers & leaves (have a little fun playing around with the arrangements) & place them around each of the panels. Use the cut out pieces from the open leaf diecuts in a scattered fashion across the page.


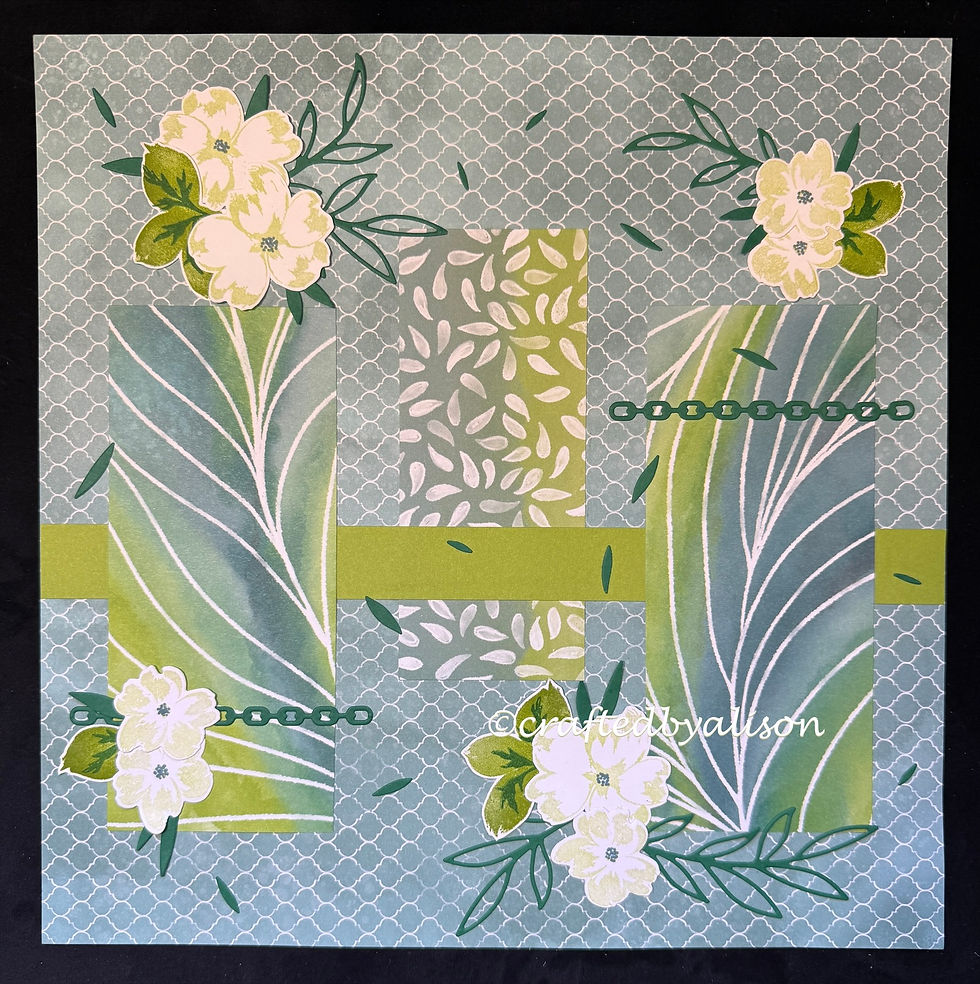
That brings us to the end of my tutorial. I hope you've enjoyed this Mystery Scrapping project. Perhaps you will lose this layout for a page of your own?
My next post will be on Sunday where I will share a 3D project for you to create.
Next week's mid week blog looks at how to use the White Wash technique in your projects.
I hope you can join me for both of them.
I have included some links below for products that were used in today's project as well as some craft room essentials.
Til next time, take care & keep creating. XX Alison
Stamps, Dies, Embossing folders & punches
Petals of Beauty bundle save 10%
Textured Notes dies this product is now retired
Cardstock, DSP & paper goods
Inks & Markers
Embellishments
No embellishments used for this project.
Adhesives
Tools


Comments