
15/4 - Mid week #210 Funfolds!
- Alison Culliver
- Apr 15
- 5 min read

Updated: Apr 16
Explore using a Triple Z fold to create funfold designs.
Hello & welcome to my mid week blog.
My name is Alison & I live in beautiful Melbourne, Australia & I am an independent Stampin' Up® demonstrator.
I love to create beautiful things to share with people that I love but I also sell me creations. I have been creating things in one way or another for most of my life - knitting, sewing, cooking, card making, gardening, scrap booking & hand made gifts & in 2020 after joining Stampin' Up® I decided to share my passion in a blog (craftedbyalison@blogspot.com).
In 2025 I retired & decided to spread my creative wings a little more by combining my blog, products that I had been selling on FaceBook & launching a newsletter. Some of these things I had already been doing but this time they are all in the one place. (All previous posts can be found at my blogspot address above if you would to read any of them.)
And here we are at my new site!
My mid week posts look at techniques, tools & tips, colouring ideas & techniques, sketches & funfolds. This week I am sharing a Triple Z funfold as I love using funfolds to create cards with a little bit of WOW factor & a Triple Z fold sure does have the WOW but is also pretty easy to create.
Here is the card I created using this design...

I totally love how this card turned out - partly because I love funfolds but also because the DSP I chose features one of my favourite flowers, Lily of the Valley which just so happens to be my birth month flower!
To get the measurements right I went to the usual places - facebook, youtube & pinterest - & found an easy to follow example at Cards by Laura on Facebook where there is also a link to her Youtube video at Creative Gems.
I then created a template so that I can use this design any time I like...

I also wrote the cutting instructions down so that they are easier to follow. They are broken down into the back, centre & front pieces, just like the template above & can be cut from one piece of 12" x 12" cardstock.
I chose Peaceful Pine (an upcoming In Colour) & Darling Duckling cardstock & three different patterns from the Lily of the Valley DSP for my card.
Base Back: 11" x 4 1/4"
Base Centre: 11" x 3"
Base Front: 11" x 1 1/2"
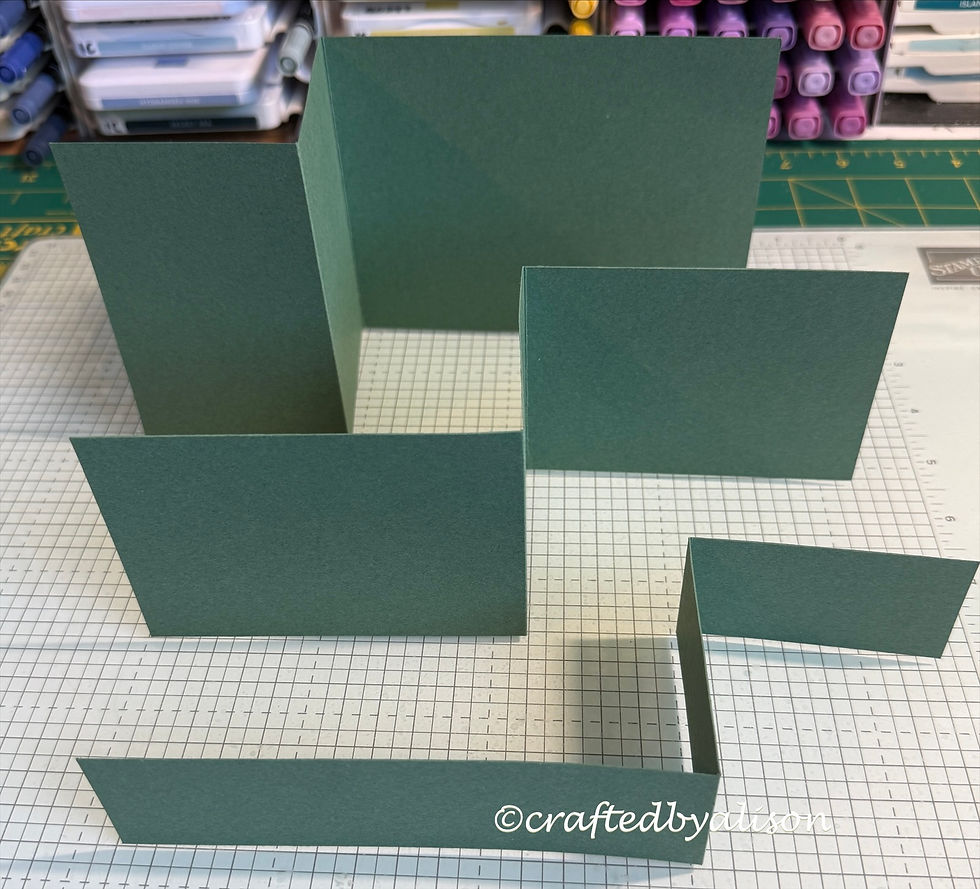
Next to cut is the mattes for each section with each section needed 3 pieces.
Back: 4" x 5 1/4", 4" x 2 1/2" & another 4" x 2 1/2"
Centre: 2 3/4" x 4", 2 3/4" x 3 3/4" &2 3/4" x 2 1/2"
Front: 1 1/4" x 5 1/4", 1 1/4" x 2 1/2" & another 1 1/4" x 2 1/2"
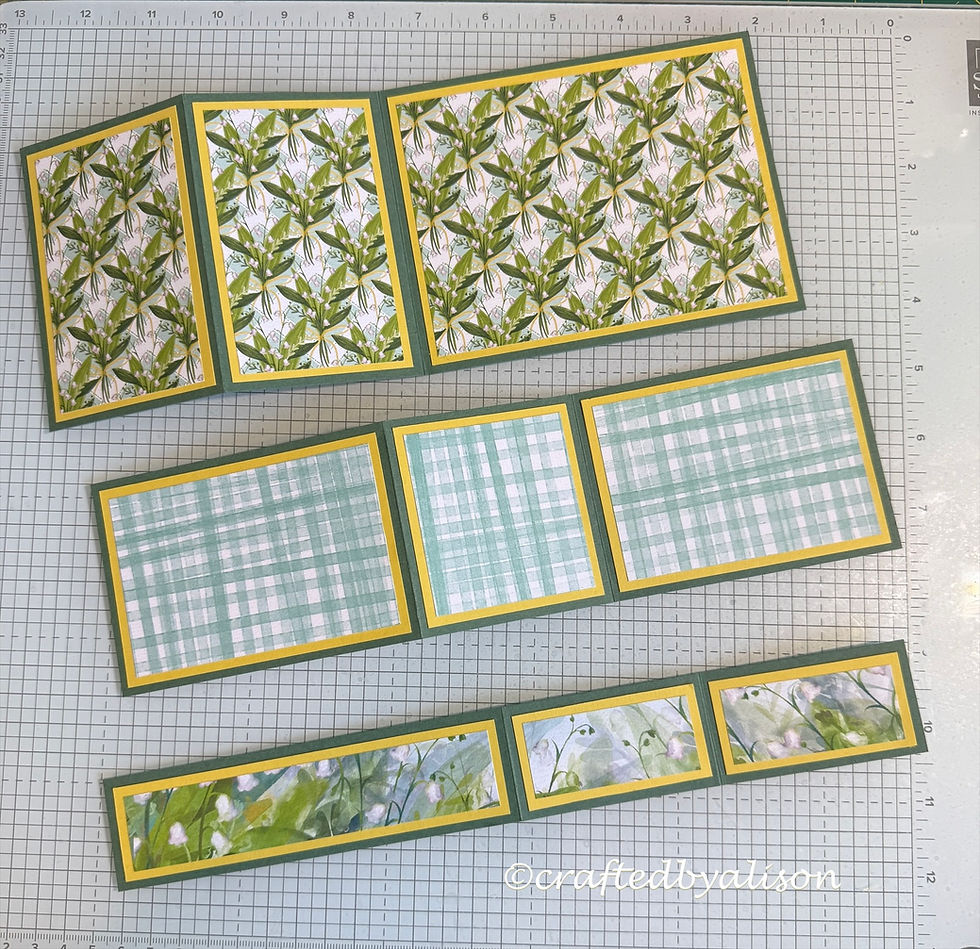
The DSP is then cut as follows:
Back: 3 3/4" x 5", 3 3/4" x 2 1/4" & another 3 3/4" x 2 1/4"
Centre: 1" x 5", 1" x 2 1/4" & another 1" x 2 1/4"
There is also a 4" x 2 1/2" matte & a 3 3/4" x 2 1/4" Basic White matte for the reverse of the card.
##Note, as I was working on this project I decided to add a second writing area on the reverse for writing a message. This had a matte of 4" x 5 1/4" with a Basic White matte of 3 3/4" x 5".
Here are all of the cut pieces (minus the extra writing area) ...

All of the pieces were adhered to each layer...
This is now where you have to focus. Apply liquid glue to the last section of the centre section & adhere to the back section. Carefully apply glue to the section on the left of this panel & adhere to the left panel of the back section. You only need approx. half of the area glued as it is larger than the back panel.
Repeat this step with the front panel, remembering to only glue the area on the left of this panel that will be in contact with the centre section.
Here is the finished card after I added some extra images.
So that brings us to the decoration of the card.
I used the Lily of the Valley stamps & dies with the new Peaceful Pine ink for the outline & Granny Apple Green ink & blends for the leaves.
In the DSP I noticed there is a soft mauve hue to the flowers so I got out my retired Purple Posy blend & added a little colour to the blooms.
All of the images were then diecut with a couple of extra images snipped to arrange for a slight 3D effect around the card.

Nearly at the finish line now.
On the smaller of the Basic Whites for the reverse of the card I stamped a small image, coloured parts of it as per the previous images & added a sentiment in Blackberry Bliss. On the larger matte I added a smaller section of the blooms.

Last but not least was the sentiment & embellishments.
The sentiment is again stamped in Blackberry Bliss & backed with the same colour cardstock.
Those cute gems are from the Valley in Blooms suite & are called Shimmering dots. The great thing about this fold is that it still folds down to fit into a regular envelope.

I loooved making this card & can't wait to play around some more with this suite.
So, that's my card completed. I hope you enjoyed this fun way to create & the finished effect. I will add some links to my shop for the products I used at the end of this post.
My next post is on Sunday when I will be spotlighting a great way to use dies.
Next week's mid week post will feature a Mystery Stamping project with a twist - it will be a scrapbook page.
I hope you can join me for both of them.
Til next time, take care & keep creating! XX Alison
Here are some links to the products that I used today & some craft room essentials.
Stamps, Dies, Embossing folders & punches
The Valley in Bloom suite will be available from May 5th.
Cardstock, DSP & paper goods
Peaceful Pine cardstock will be available from May 5th.
Valley in Bloom DSP will be available from May 5th.
Inks & Markers
Peaceful Pines Classic Stampin' pad will be available from May 5th.
Embellishments
Shimmering dots will be available from May 5th.
Adhesives
Tools


Comments