
11/2 Midweek #201 - Tips for using the Stampin' Cut & Emboss machine
- Alison Culliver
- Feb 11
- 6 min read

Lots of tips for getting the best out of the Stampin' Cut & Emboss machine.
Hello & welcome to my mid week blog.
My name is Alison & I live in beautiful Melbourne, Australia & I am an independent Stampin' Up® demonstrator.
I love to create beautiful things to share with people that I love but I also sell me creations. I have been creating things in one way or another for most of my life - knitting, sewing, cooking, card making, gardening, scrap booking & hand made gifts & in 2020 after joining Stampin' Up® I decided to share my passion in a blog (craftedbyalison@blogspot.com).
In 2025 I retired & decided to spread my creative wings a little more by combining my blog, products that I had been selling on FaceBook & launching a newsletter. Some of these things I had already been doing but this time they are all in the one place. (All previous posts can be found at my blogspot address above if you would to read any of them.)
And here we are at my new site!
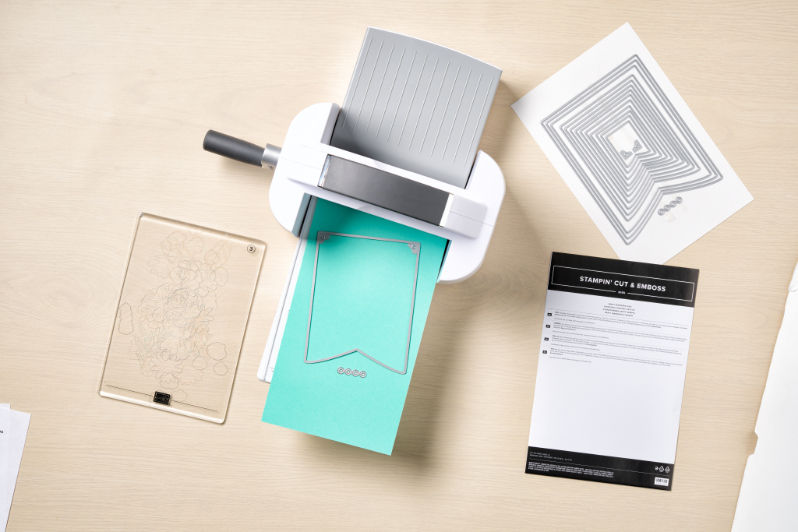
In today's post I am spotlighting one of the very useful tools from Stampin' Up® called the Stampin' Cut & Emboss machine. It's a compact little machine that is similar to the old fashioned 'mangle' that used to be attached to washing machines to wring out wet clothes. I know that must sound odd when you think of crafting but that's what it reminds me of as there is a platform that you put your work onto then you turn a handle & it all rolls through the machine, pressed with rollers along the way & out the other end comes your die cut or embossed materials. Here's some information from Stampin' Up® on what the Stampin' Cut & Emboss machine is & how it works.
What is Die Cutting?
Die cutting is a process that involves using a die—a metal blade—to cut paper into specific shapes or designs. It’s similar to using a cookie cutter, but instead of cutting dough, the die slices through the material, making a clean, precise cut using pressure often applied by a machine.
In the case of the Stampin’ Cut & Emboss Machine and its mini counterpart, paper or cardstock is layered between your die and a set of plastic plates that help the machine evenly apply pressure as you turn the crank and the “sandwich” rolls across the machine’s platform.
The result is a perfectly cut shape every time! That can mean anything from extremely detailed lettering to the perfect outline for a stamped image and more!

Selecting Dies for Your Crafting Projects
Just like when selecting stamping for your crafting projects, you’ll want to choose the dies that will serve your needs best.
It’s a good idea to look for classic shapes you’ll use again and again (think flags, florals, frames) and some common sentiments (messages of love, birthday wishes, and congratulations are a great place to start). Then, as your confidence and creativity grow, you get to expand your collection of dies to whatever you dream up.
One incredibly satisfying way to choose your dies is by their coordination with stamp sets you adore. While plain, cut shapes are a great resource for creative paper crafting, stamped and perfectly die-cut elements elevate your cards and scrapbook layouts to a whole new level of personalised professionalism and fun! No more aching over accidental scissor slips or misshapen results—just your favourite stamps highlighted in a clean and polished way.
Simple Tips for Die Cutting
When done correctly, die cutting is super useful and satisfying for card making and scrapbooking. Not everyone likes to fussy cut out images or sentiments, especially if there are a lot to do & using a die cutting machine can save you so much time in your craft room. Here are some quick and easy tips for using a die-cutting machine to its fullest.
Cycle Through Die Cutting Plates
As you can imagine, the sharp metal dies will eventually make impressions in the hard plastic plates used to send your die and paper through the machine. If you start to see that any of these impressions are pressing grooves into your paper die, switch out the plate for a new one, putting the smoothest surface closest to your paper.
I use one plate continuously at the bottom with the top remaining clearer as there is no cutting or indentations when used only as a top plate. I used to rotate the plates but found that they needed to be replaced more often as the impressions appeared more often when both were used for cutting.
I keep a 'clean' one to one side specifically for using with foils as they are more sensitive to any indentations or impressions left behind from previous projects.
I also leave the plates half way inside the machine when not in use by turning the handle until the plates reach half way in the machine. This helps to prevent the plates from buckling with all of the use as the pressure keeps them straight.
Use Repositionable Tape
To prevent your die from shifting as it moves through the machine, gently secure it to your paper with re-positionable tape such as Washi tape (make sure to take off some of the stickiness before using though by pressing against your clothes or skin so that it doesn't get too stuck on your cardstock or papers & tear them), Masking Paper or even post it notes. The larger the die, the more tape or pieces you may want to use.
Once covered with a plate, you can safely roll the paper and die through the machine.
Carefully remove the taped die, and you’ve got precision-cut images or text!

Cut On an Angle
When cutting out a square or fairly large shape with flat edges, turn your die at an angle rather than having a large flat side aligned with the plates. It helps the machine grab at the sandwiched plates and roll them through without slipping, which could result in uneven cuts.
Stamp First, Cut Second
If you’re using matching stamp and die sets, make sure to stamp first and cut second. This way, you can perfectly align the die with your stamped image for a precisely bordered cutout every time.
Use a Pick
Detailed and delicately designed die cuts can be tricky to handle without the proper tools. Stampin' Up®s Take Your Pick tool makes manoeuvering everything from thin lettering to sequins a breeze. Plus, you can easily grab a part of your die cut’s design and slowly pull it away from the excess paper without the risk of fumbling or tearing as the Take Your Pick tool comes with 3 different heads - a pointer, spatula blade & putty tip included.

Expand the Use of Your Machine
Double the duty of your die-cutting machine by using embossing folders to add clean and detailed dimension to your creations. Simply place your paper between an embossing folder and run through the machine normally, and voila, tons of texture and visual interest are created in just seconds!
To achieve an embossed finish the 'sandwich' layers are a little different than those used for die cutting. To emboss you use the same base plate (plate #1) but the next layer is the embossing folder with cardstock inside, with the fold of the embossing folder facing towards the machine.

The grey embossing plate (plate # 4) is placed on top of the plate # 1-paper-embossing folder sandwich and this is then passed through the Stampin’ Cut and Emboss Machine by using the hand crank.
The embossing folder will leave an impression on your cardstock without cutting the paper.
So that's my tips for you on how to use the Stampin' Cut & Emboss machine to elevate your designs & creations to the next level. I hope this has been helpful to you. I have provided links throughout this post for the tools as they are mentioned so there are no further links to share as I usually do. If you have any questions, please feel free to email me at craftedbyalison@gmail.com.
My next post will be on Sunday where I will share a double page scrapbook layout.
Next week's mid week post will look at how to create 4 cards from one stamping session!
I hope you can join me for both of them.
Til next time, take care & keep creating!
XX Alison


Comments